

I'm assuming a fair bit of RC knowledge and common sense throughout this guide so I might skip little building steps if I consider them self explanatory and/or covered in the manual. However, if you have specific questions leave me a comment and I'll do my best to answer them asap. I’d like to thank Ed Clark for his tips and help on his forum (THard.co.uk - TRF416: Things to Know) and also a certain Mr. Groskamp who did some videos on building the Tamiya with RedRC (YouTube - Red RC Pro Tips with Jilles Groskamp).
First things first, let's begin with the prep work. Sanding and gluing carbon fibre edges is hardly anyone’s favourite task (if it's yours please leave me contact details so I can send you my next chassis) but it needs to be done in my opinion and makes the whole thing look a lot nicer. Here's some before and after shots of mine, I spent a little time on this but have found in the past the longer spent on the sanding part the better the results.


You might also need to sand the top and bottom ‘tips’ of the top deck - if you don’t it could bind on the bulkheads and badly tweak the chassis. I found I had to take about 0.5mm off each end of mine.

While we’ve got the emery paper out, attack the diff plates. As you can see below it greatly improves the surface for the balls to run across. I used 600grit paper to flatten out both sides of the plates and scuff them slightly giving the balls something to grip. This new flat surface and scuffing results in a slip-free diff that is not overly tight.


I assembled my diff with an assortment of non-standard parts including TRF Ceramic Diff Balls, Jaad Racing Ceramic Thrust Race, Schumacher Diff Grease, Associated Black Grease and Jaad Racing Diff Covers. I also used Tamiya Hard Grease to stick the diff plates to the outdrives. I have just superglued them on in the past which works really well but I’m never comfortable doing, so if the hard grease is good enough for Jillies... I might experiment between the two methods in the future though. Don’t forget to put threadlock on the diff screw/diff nut connection... unlike someone else...


Layshaft and Spool go together without a hitch and look mighty fine with the white and blue colour combo!


For the installation of the wishbones follow Jillies’ video to the letter. It’s a great explanation and all the shimming is spot on I found. I even managed to find some of that illusive Hybrid Blue Grease so I could see what it was like. I did find I had to ream the wishbones with a 3mm arm reamer to free them up, I’m sure they would have freed up with some use, but I’m impatient.

Next up, put all the drivetrain assembly into the bulkheads. I found, like Jilles, that the bulkhead clamps did squash the bearing holders slightly so I put some 0.1mm shims on like he recommended. Bonus point if you can spot them in the picture below. It’s like a “Where’s Wally?” picture, but for RC geeks, and cooler obviously...
Steering assembly now. If you get this far and haven’t used any threadlock yet, your steering will fall apart coming onto the final straight when you’re winning your first ever A final at your local club at the first meeting with the car AND cost you the race. Tried, tested and guaranteed. Don’t ask.

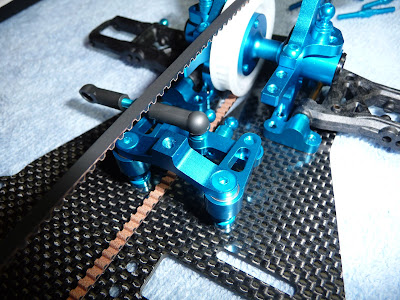
I decided to put the servo in now. Thought the way the servo mounted over and around the belt was pretty cool so I took a picture of it as well.


Roll bar mounts were next on my to do list. Simple enough, you just need to follow the instructions in the manual and be fairly deft and accurate with a scalpel for trimming various bits off the ball cups. Yet more of the Tamiya ‘hobby’ experience I had genuinely missed since my Mad Bull – you have to do little bits of the finishing process yourself. Gives a greater sense of achievement I think.

Break out the pin drill for the next step, the front c-hubs and the rear uprights need holes drilling for the grub screw which holds the outer hingepin in place in the wishbone. I also assembled my car with the plastic hubs after hearing the graphite ones had a tendency to break indoors, but I’ll put them back on for outdoors and maybe test indoors with them in the future. The graphite and plastic look pretty similar in this picture, but the plastic ones are a lot blacker (and softer) in reality.


Driveshafts next on the menu, assemble as per manual. I used Xenon blue grease on the joints. Make sure you put some threadlock on the grub screws and try to avoid getting any grease on that tiny bit of thread. The manual doesn’t mention threadlock anywhere, I should have known better for the steering, but the driveshafts were pretty obvious even to me.


A few moments later and they’re on the car...


The bit I’ve been waiting for, the world famous Tamiya shocks. I can confirm - they are simply a joy to build and end up working flawlessly with the same amount of rebound every time. Makes you wonder why all the other manufacturers haven’t just given up making shocks really. I built mine with TRF Competition O-rings which look suspiciously like the popular MuchMore items, I’ve got some MuchMore ones to try later as well. Don’t forget Jillies excellent tip about the 0.1mm shim under the piston to remove any play. And whatever you do, don’t hurt those gorgeous gold shock shafts with nasty pliers when you’re putting the ball ends on – side cutters on the tip of the threads are the order of the day.


The Tamiya shock pump I’ve had for a while now is finally given the honour to remove air from some genuine Tamiya shocks. It didn’t say anything but I could tell it was happy with its new found purpose in life.

Shocks and roll bars on the car and we’re looking nearly ready to roll...

After some turnbuckles, solder, servo tape, setup gauges...


And a can of white spray paint later...

SORTED!

Hi mate couple of quick questions, just wondering where you got the xenon blue grease from ? cant find it anywhere lol also how did you solder the clever little connector for your lipo ? Cheers
ReplyDeleteHi, just found this comment, sorry it's a bit late to reply... I got the Xenon Blue Grease from Champ RC in Japan. The Li-Po connector was just a bent retro battery bar with a male Corally soldered on one end and a female Corally soldered on the other end.
ReplyDelete